Prorated Accruals Extension
Prorated Accruals distribute accruals entitlements proportionally on the date of hire or termination, or a change to employment contract based on the number of remaining days in the reference accruals period.
Prorated Accruals integrations satisfy the following use cases:
- Prorated Accruals Hire: Distribute accruals entitlements for newly hired or re-hired employees who enter service during the accruals reference period.
- Prorated Accruals FTE: Recalculate and distribute accruals when employees change status to full-time equivalent (FTE).
- Prorated Accruals Termination: Recalculate and distribute accruals, and automatically pay the ending balance, when employees are terminated.
Use cases
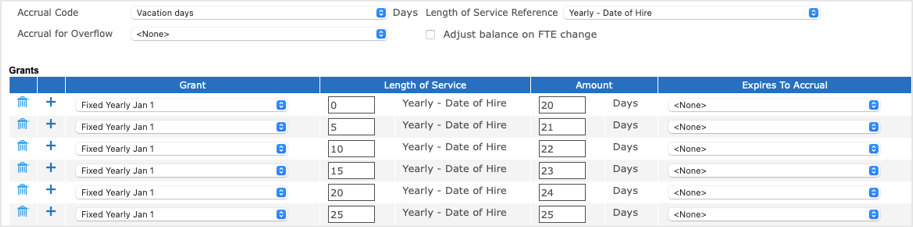
Length of service
In some organizations or jurisdictions, accruals grants increase based on employees' length of service. The Prorated Accruals integrations can account for these changing accruals grants.
A new employee starts with a grant of 20 days of vacation each year. After every 5 years of added seniority, the employee is granted one more day of vacation. After 25 years of service, the employee has an accruals grant of 25 days of vacation.
The employee's accrual policy is as follows:
- Accrual Code = Vacation days.
- Accrual for Overflow = <None>.
- Length of Service Reference = Yearly — Date of Hire.
- Adjust balance on FTE change = not selected.
- Add
Grants as follows:
- Each Grant = Fixed Yearly Jan 1.
- Length of Service starts at 0 and increments by 5 until it reaches 25.
- Amount starts at 20 and increments by 1 until it reaches 25.
- Expires to Accrual = <None>.
The integration uses the cross-reference tables to map the grants to the lengths of service as follows:
- _AccrualPolicy_CRT: Version, Length of Service, and Length of Service Reference columns
- _DatePattern_CRT: Length of Service Reference, Date Pattern Reference Date, Date Pattern Frequency Number, Date Pattern Frequency columns
Vacation grant based on negotiated length of service for a new hire
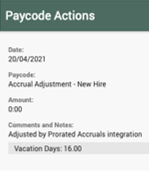
An employee starts employment on April 20, 2021 but negotiated 10-years seniority based on a previous position at another organization.
Even though the new employee's Hire Date is
20/04/2021, the Length of Service in the Accrual Policy uses a Person Specific Date of
20/04/2011 to override the Hire Date. This adds 10 years to the Length of Service, and qualifies the new employee for a Vacation grant as if the employee has 10-years seniority. So, the employee qualifies for 22 days of vacation.
The Vacation grant for the new employee is prorated for the remainder of 2021 is as follows:
- The employee qualifies for 22 days of vacation, but from the hire date of April 20 to the end of the first year are 256 days.
- As a result, the prorated vacation grant is (22/356) x 256 = 15.43 days.
- The organization rounds up to the next full day, and the vacation grant is 16 days for the first calendar year.
- The Timecard shows a paycode that explains the adjustment.

Configure the Prorated Accruals integrations
- Before you start: Before you configure this integration, you must do the following:
- Configure Access to Integrations.
- Configure the following Hyperfinds; see the Hyperfind Queries topic:
- Prorated Accruals Employees – Hire: A hyperfind that contains active employees only
- Prorated Accruals Employees – FTE: A hyperfind that contains FTE employees only
- Prorated Accruals Employees – Termination: A hyperfind that contains terminated employees only
- Create the following paycodes as dummies to use as paycode edits; see the Paycode Definition topic:
- Hourly Adjustment
- Hourly Overdraft
- Check the accrual policy — see the Accrual policies topic — and check the following:
- If accruals grants increase based on length of service, select the Length of Service Reference date that specifies when milestones occur and grant and limit amounts change.
- Make sure that Adjust balance on FTE change is not selected.
- Create an extension table that specifies the DDL commands for the integration template; see the Extension Tables topic.
- Configure integration list parameters to define a Rounding Rules property with the Values as follows; see the Configure Integration List Parameters topic:
- No Round: Select Default Value.
- Round Down 0.5
- Round Down 1.0
- Round Up 0.5
- Round Up 1.0
- Get the URL, User, and Password for the APIGatewayServer.
- Deploy the ProratedAccuralsHire, ProratedAccuralsFTE, and ProratedAccrualsTermination integration packs; see the Deploy Integration Packs to your Atom topic.
- Select the environment
-
Open the Integration Template Designer: Select Main Menu
. Note: If prompted, enter your Username and Password. Click Tap Log in. - Select the Manage tab > Atom Management.
- Select your environment.
-
- Configure the Prorated Accruals Hire integration
- Select environment extensions
- In Administration, click tap Environment Extensions.
- In Process Filter, click tap the magnifying glass
 . It can take several seconds before the button becomes active.
 - Scroll to and select the integration pack: .
- Select environment extensions
- In Administration, click tap Environment Extensions.
- In Process Filter, click tap the magnifying glass . It can take several seconds before the button becomes active.
- Scroll to and select the integration pack: .
- Configure connection settings
Caution: If you select Use Default for the connection settings and process properties, ensure that Value is blank. If Value is not blank, that value overrides the default value whether or not Use Default is selected or cleared. Example: If the default value is abc, but Value shows xyz, the integration uses xyz regardless of the setting of Use Default.
- Select Connection Settings.
-
From the Connection dropdown list, select and configure the following:
Connection Settings
Connection Settings for this integration
Setting
Required
Actions
APIGatewayServer
Required
To change the default API gateway server:
- Clear Use Default.
- Enter the URL to the server.
Example:
<tenantURL>/api
ProratedAccrualsHire_v4.4_DataBaseServer
Required
The database server setting defines the connection to the file that contains the records.
To change the default server parameters:
- For each field, clear Use Default.
- Enter the following values:
In User, enter the username for the server.
In Password, select <Encrypted>. Enter the password for the server. Click Tap Apply.
Enter the Class Name.
Enter the Connection URL for the database server.
SFTPServer
Required
The SFTP server setting defines the connection to the file that contains the records. Integrations access only the internal SFTP account.
To change the default SFTP server parameters:
- For each field, clear Use Default.
- Enter the following values:
-
Enter the name of the internal Host.
-
Enter the number of the Port for the internal SFTP account.
-
In User, enter the username for the internal SFTP account.
-
In Password, select <Encrypted>. Enter the new password for the internal SFTP account.
-
Click Tap Apply.
-
- Configure process properties
- Select Process Properties. Caution: Do not edit the default values of the AuthenticationProperties. By default, cookies are enabled and set the values for authentication properties.
-
Select ProratedAccrualsHire_v4.4_Control to set process properties that must be configured before the integration can run.
Process Properties
Process Properties for this integration
Property
Required
Actions
Hyperfind Name
Required
Note: The default hyperfind is 1 (shown as blank) which indicates All Home and includes all active employees.Select the hyperfind query for new and re-hired employees only:
- Clear Use Default.
- Select the Prorated Accruals Employees – Hire hyperfind,
Person Numbers
Not required
Caution: Recommended: Leave Use Default selected to include all employees in the hyperfind.Default = Include all employees.
To process data for only a limited group of employees:
- Clear Use Default.
- Enter the person numbers, as defined in the source system, each separated by a comma (
,) but no spaces.Example:
13997,15556,20012
Rounding
Required
Select the rounding rule:
- Clear Use Default.
- Select one of the following:
- No Round (default)
- Round Down 0.5
- Round Down 1.0
- Round Up 0.5
- Round Up 1.0
Adjustment Paycode
Required
Select the adjustment paycode to use for paycode edits:
- Clear Use Default.
- Select Hourly Adjustment.
Adjustment Comment
Not required
Specify the comment to use for adjustment paycode edits:
- Clear Use Default.
- Enter the comment.
ValidateAccrualCodeInCRT
Required
Default = false.
Set this property to use the AccrualPolicy cross-reference table to get the accrual policy details for new and re-hired employees:
- Clear Use Default.
- Select true.
- Select Process Properties.
- Configure cross-reference tables
Cross-reference tables (CRT) are the look-up tables that the integrations use to translate parameter values. One or more data values from the source system can be used to assign one or more parameters in the destination system.
Note:- If more than one row matches a reference value, the first match is the output value.
- If no match is found, the output value can be null, or the integration can produce errors.
- Select Cross Reference.
-
From the Cross Reference dropdown list, select the following cross-reference tables:
ProratedAccrualsHire_v4.4_AccrualPolicy_CRT — Get the accrual policy details for employees.
Column headers:
Accrual Profile,Accrual Code,Unit,FTE Grant Amount (Decimal),Grant Date(mm/dd),Monthly Grant(Y/N),Disallow Overdraft Amount (Decimal),Version,Length of Service,Length of Service Reference- Accrual Profile = The name of the accrual profile that groups accrual policies; the profile is assigned to employees.
- Accrual Code = The code for the accrual from which time or money is debited and credited.
- Unit = The unit for the accrual of time or money.
- FTE Grant Amount = The amount of the grant for full-time equivalent (FTE) employees; use decimal format.
- Grant Date = The date when the grant is awarded.
- Monthly Grant = Whether grant is awarded monthly or not.
- Disallow Overdraft Amount — The limit where the system disallows a paycode edit that causes an overdraft. The disallow amount must be more than the warning amount. If no warning amount is set, the value can be 0 (zero).
- Version = An internally generated number that identifies multiple versions of the same accrual code.
- Length of Service = The qualifying value for each version of the accrual code; can be in days, weeks, months, or years.
- Length of Service Reference = The name of the date pattern for the length of service.
ProratedAccrualsHire_v4.4_DatePattern_CRT — Get the length-of-service details for accruals grants that increase based on employees' length of service.
Column headers:
Length of Service Reference,Date Pattern Reference Date,Date Pattern Frequency Number,Date Pattern Frequency- Length of Service Reference = The name of the date pattern for the length of service; this name is used in the AccrualPolicy_CRT.
- Date Pattern Reference Date = The anchor date for the date pattern. Select Date of Hire, Person Specific Date, or Fixed Date. Note: Symbolic dates must be configured with a fixed date. Example: First Day of Month for a monthly recurring grant can use
01/01/1900as a fixed date reference. - Date Pattern Frequency Number = The number for repetitions of the date pattern. Examples: Once (1) a year. Every 4 weeks. Every 90 days.
- Date Pattern Frequency = The frequency of recurrence of the date pattern. Select Days, Weeks, Months, or Years.
-
Select Override to:
- Download the tables when you run the integration
- Edit the table cells in Extensions
- When you finish, click tap OK.
- Select environment extensions
- Configure the Prorated Accruals FTE integration
- Select environment extensions
- In Administration, click tap Environment Extensions.
- In Process Filter, click tap the magnifying glass . It can take several seconds before the button becomes active.
- Scroll to and select the integration pack: .
- Configure connection settings Caution: If you select Use Default for the connection settings and process properties, ensure that Value is blank. If Value is not blank, that value overrides the default value whether or not Use Default is selected or cleared. Example: If the default value is abc, but Value shows xyz, the integration uses xyz regardless of the setting of Use Default.
- Select Connection Settings.
-
From the Connection dropdown list, select and configure the following:
Connection Settings
Connection Settings for this integration
Setting
Required
Actions
APIGatewayServer
Required
To change the default API gateway server:
- Clear Use Default.
- Enter the URL to the server.
Example:
<tenantURL>/api
ProratedAccrualsFTE_v4.5_DataBaseServer
Required
The database server setting defines the connection to the file that contains the records.
To change the default server parameters:
- For each field, clear Use Default.
- Enter the following values:
In User, enter the username for the server.
In Password, select <Encrypted>. Enter the password for the server. Click Tap Apply.
Enter the Class Name.
Enter the Connection URL for the database server.
SFTPServer
Required
The SFTP server setting defines the connection to the file that contains the records. Integrations access only the internal SFTP account.
To change the default SFTP server parameters:
- For each field, clear Use Default.
- Enter the following values:
-
Enter the name of the internal Host.
-
Enter the number of the Port for the internal SFTP account.
-
In User, enter the username for the internal SFTP account.
-
In Password, select <Encrypted>. Enter the new password for the internal SFTP account.
-
Click Tap Apply.
-
- Configure process properties
- Select Process Properties. Caution: Do not edit the default values of the AuthenticationProperties. By default, cookies are enabled and set the values for authentication properties.
-
Select ProratedAccuralsFTE_v4.5_Control to set process properties that must be configured before the integration can run.
Process Properties
Process Properties for this integration
Property
Required
Actions
Hyperfind Name
Required
Select the hyperfind query for FTE employees only:
- Clear Use Default.
- Select the Prorated Accruals Employees – FTE hyperfind,
Person Numbers
Not required
Leave Use Default selected to include all employees in the hyperfind.
Rounding
Required
Select the rounding rule:
- Clear Use Default.
- Select one of the following:
- No Round (default)
- Round Down 0.5
- Round Down 1.0
- Round Up 0.5
- Round Up 1.0
Adjustment Paycode
Required
Select the adjustment paycode to use for paycode edits:
- Clear Use Default.
- Select Hourly Adjustment.
Adjustment Comment
Not required
Specify the comment to use for adjustment paycode edits:
- Clear Use Default.
- Enter the comment.
Overdraft Paycode
Not required
Select the overdraft paycode to use for paycode edits:
- Clear Use Default.
- Select Hourly Overdraft.
Overdraft Comment
Not required
Specify the comment to use for overdraft paycode edits:
- Clear Use Default.
- Enter the comment.
ValidateAccrualCodeInCRT
Required
Default = false.
Set this property to use the AccrualPolicy cross-reference table to get the accrual policy details for employees who change status to FTE:
- Clear Use Default.
- Select true.
- Select Process Properties.
- Configure cross-reference tables
Cross-reference tables (CRT) are the look-up tables that the integrations use to translate parameter values. One or more data values from the source system can be used to assign one or more parameters in the destination system.
Note:- If more than one row matches a reference value, the first match is the output value.
- If no match is found, the output value can be null, or the integration can produce errors.
- Select Cross Reference.
-
From the Cross Reference dropdown list, select the following cross-reference tables:
ProratedAccrualsFTE_v4.5_AccrualPolicy_CRT — Get the accrual policy details for employees.
Column headers:
Accrual Profile,Accrual Code,Unit,FTE Grant Amount (Decimal),Grant Date(mm/dd),Monthly Grant(Y/N),Disallow Overdraft Amount (Decimal),Version,Length of Service,Length of Service Reference- Accrual Profile = The name of the accrual profile that groups accrual policies; the profile is assigned to employees.
- Accrual Code = The code for the accrual from which time or money is debited and credited.
- Unit = The unit for the accrual of time or money.
- FTE Grant Amount = The amount of the grant for full-time equivalent (FTE) employees; use decimal format.
- Grant Date = The date when the grant is awarded.
- Monthly Grant = Whether grant is awarded monthly or not.
- Disallow Overdraft Amount = The limit where the system disallows a paycode edit that causes an overdraft. The disallow amount must be more than the warning amount. If no warning amount is set, the value can be 0 (zero).
- Version = An internally generated number that identifies multiple versions of the same accrual code.
- Length of Service = The qualifying value for each version of the accrual code; can be in days, weeks, months, or years.
- Length of Service Reference = The name of the date pattern for the length of service.
ProratedAccrualsFTE_v4.5_DatePattern_CRT — Get the length-of-service details for accruals grants that increase based on employees' length of service.
Column headers:
Length of Service Reference,Date Pattern Reference Date,Date Pattern Frequency Number,Date Pattern Frequency- Length of Service Reference = The name of the date pattern for the length of service; this name is used in the AccrualPolicy_CRT.
- Date Pattern Reference Date = The anchor date for the date pattern. Select Date of Hire, Person Specific Date, or Fixed Date. Note: Symbolic dates must be configured with a fixed date. Example: First Day of Month for a monthly recurring grant can use
01/01/1900as a fixed date reference. - Date Pattern Frequency Number = The number for repetitions of the date pattern. Examples: Once (1) a year. Every 4 weeks. Every 90 days.
- Date Pattern Frequency = The frequency of recurrence of the date pattern. Select Days, Weeks, Months, or Years.
-
Select Override to:
- Download the tables when you run the integration
- Edit the table cells in Extensions
- When you finish, click tap OK.
- Select environment extensions
- Configure the Prorated Accruals Termination integration
- Select environment extensions
- In Administration, click tap Environment Extensions.
- In Process Filter, click tap the magnifying glass . It can take several seconds before the button becomes active.
- Scroll to and select the integration pack: .
- Configure connection settings
Caution: If you select Use Default for the connection settings and process properties, ensure that Value is blank. If Value is not blank, that value overrides the default value whether or not Use Default is selected or cleared. Example: If the default value is abc, but Value shows xyz, the integration uses xyz regardless of the setting of Use Default.
- Select Connection Settings.
-
From the Connection dropdown list, select and configure the following:
Connection Settings
Connection Settings for this integration
Setting
Required
Actions
APIGatewayServer
Required
To change the default API gateway server:
- Clear Use Default.
- Enter the URL to the server.
Example:
<tenantURL>/api
ProratedAccuralsTermination_v4.4_DataBaseServer
Required
The database server setting defines the connection to the file that contains the records.
To change the default server parameters:
- For each field, clear Use Default.
- Enter the following values:
In User, enter the username for the server.
In Password, select <Encrypted>. Enter the password for the server. Click Tap Apply.
Enter the Class Name.
Enter the Connection URL for the database server.
SFTPServer
Required
The SFTP server setting defines the connection to the file that contains the records. Integrations access only the internal SFTP account.
To change the default SFTP server parameters:
- For each field, clear Use Default.
- Enter the following values:
-
Enter the name of the internal Host.
-
Enter the number of the Port for the internal SFTP account.
-
In User, enter the username for the internal SFTP account.
-
In Password, select <Encrypted>. Enter the new password for the internal SFTP account.
-
Click Tap Apply.
-
- Configure process properties
- Select Process Properties. Caution: Do not edit the default values of the AuthenticationProperties. By default, cookies are enabled and set the values for authentication properties.
-
Select ProratedAccuralsTermination_v4.4_Control to set process properties that must be configured before the integration can run.
Process Properties
Process Properties for this integration
Property
Required
Actions
Hyperfind Name
Required
Select the hyperfind query for terminated employees only:
- Clear Use Default.
- Select the Prorated Accruals Employees – Termination hyperfind,
Person Numbers
Not required
Leave Use Default selected to include all employees in the hyperfind.
Rounding
Required
Select the rounding rule:
- Clear Use Default.
- Select one of the following:
- No Round (default)
- Round Down 0.5
- Round Down 1.0
- Round Up 0.5
- Round Up 1.0
Adjustment Paycode
Required
Select the paycode to use for paycode edits:
- Clear Use Default.
- Select Hourly Adjustment.
Adjustment Comment
Not required
Specify the comment to use for paycode edits:
- Clear Use Default.
- Enter the comment.
Overdraft Paycode
Required
Select the overdraft paycode to use for paycode edits:
- Clear Use Default.
- Select Hourly Overdraft.
Overdraft Comment
Required
Specify the comment to use for overdraft paycode edits:
- Clear Use Default.
- Enter the comment.
Accruals Payout
Required
To set the integration to pay out accruals balances to terminated employees:
- Clear Use Default.
- Select Value.
ValidateAccrualCodeInCRT
Required
Default = false.
Set this property to use the AccrualPolicy cross-reference table to get the accrual policy details for terminated employees:
- Clear Use Default.
- Select true.
- Select Process Properties.
- Configure cross-reference tables
Cross-reference tables (CRT) are the look-up tables that the integrations use to translate parameter values. One or more data values from the source system can be used to assign one or more parameters in the destination system.
Note:- If more than one row matches a reference value, the first match is the output value.
- If no match is found, the output value can be null, or the integration can produce errors.
- Select Cross Reference.
-
From the Cross Reference dropdown list, select the following cross-reference tables:
- ProratedAccrualsTermination_v4.4_AccrualPolicy_CRT — Get the accrual policy details for employees.
Column headers:
Accrual Profile,Accrual Code,Unit,FTE Grant Amount (Decimal),Grant Date(mm/dd),Monthly Grant(Y/N),Disallow Overdraft Amount (Decimal),Version,Length of Service,Length of Service Reference- Accrual Profile = The name of the accrual profile that groups accrual policies; the profile is assigned to employees.
- Accrual Code = The code for the accrual from which time or money is debited and credited.
- Unit = The unit for the accrual of time or money.
- FTE Grant Amount = The amount of the grant for full-time equivalent (FTE) employees; use decimal format.
- Grant Date = The date when the grant is awarded.
- Monthly Grant = Whether grant is awarded monthly or not.
- Disallow Overdraft Amount — The limit where the system disallows a paycode edit that causes an overdraft. The disallow amount must be more than the warning amount. If no warning amount is set, the value can be 0 (zero).
- Version = An internally generated number that identifies multiple versions of the same accrual code.
- Length of Service = The qualifying value for each version of the accrual code; can be in days, weeks, months, or years.
- Length of Service Reference = The name of the date pattern for the length of service.
- ProratedAccrualsTermination_v4.4_DatePattern_CRT— Get the length-of-service details for accruals grants that increase based on employees' length of service.
Column headers:
Length of Service Reference,Date Pattern Reference Date,Date Pattern Frequency Number,Date Pattern Frequency- Length of Service Reference = The name of the date pattern for the length of service; this name is used in the AccrualPolicy_CRT.
- Date Pattern Reference Date = The anchor date for the date pattern. Select Date of Hire, Person Specific Date, or Fixed Date. Note: Symbolic dates must be configured with a fixed date. Example: First Day of Month for a monthly recurring grant can use
01/01/1900as a fixed date reference. - Date Pattern Frequency Number = The number for repetitions of the date pattern. Examples: Once (1) a year. Every 4 weeks. Every 90 days.
- Date Pattern Frequency = The frequency of recurrence of the date pattern. Select Days, Weeks, Months, or Years.
- ProratedAccrualsTermination_v4.4_AccrualPolicy_CRT — Get the accrual policy details for employees.
-
Select Override to:
- Download the tables when you run the integration
- Edit the table cells in Extensions
- When you finish, click tap OK.
- Select environment extensions
Install the Prorated Accruals integrations
After the integrations are deployed and the connection settings and process properties are configured, install the integrations to make them available for running or scheduling.
-
An integration template is the configured integration that you deploy to an Atom and then install to make available for running or scheduling.
- An installed integration is a single instance of an integration that is based on an integration template. When you install an integration, you can define parameters or set parameters to be defined when the integration is run.
- Select
Main Menu
. -
Install the Prorated Accruals Hire integration
-
Click Tap
Create
. - Enter an appropriate, unique, and descriptive Integration Name.
- (Optional) Enter a Description.
- Do not select API Integration.
- In File Access, select None to not select a connection.
- (Optional) If the person who runs the integration doesn't have full access to integrations, select Execute Integration with System Account. This allows the integration access to all APIs in the FAP, and the relevant permissions and data, regardless of the FAP and GDAP of the person who runs the integration.
-
(Optional) Select Re-Run to allow repeated runs of the integration with the same parameter values as the previous run.
-
Email Notifications
(Optional)
- Select Yes to send email and control center notifications for integration runs.
- Enter the email addresses of the recipients for the following types of run status. For multiple recipients, separate the addresses by a comma, but no spaces:
In Progress — The integration run started and has not finished.
Completed — The integration ran successfully without errors.
Failed — The integration ran successfully, but one or more records have errors. The integration run is treated as failed. If Abort on Failure is configured in an integration set, the integration set stops.
Completed with Errors — The integration run has errors or could not run.
- In Skip Configuration, select None (default) to allow multiple integrations to run at the same time or with the same data without restrictions.
- Do not select Allow Minute Interval.
- Integration template and parameters
- In Integration Template, select ProratedAccrualsHire_v4.4.
-
Click Tap
Assign
. - (Optional) In Integration Parameters, you can override default settings.
- Specify the following parameters:
Specify the default hyperfind query that contains new and re-hired employees only:
Click Tap Create
. Hyperfind Name
Hyperfind Name parameter
Parameter Name
Enter Hyperfind Name.
Description
(Optional)
Template Parameter
Select Hyperfind Name.
Parameter Type
Select Text.
Default Value
(Optional) Enter Prorated Accruals Employees – Termination.
User Prompted
If the value does not need to be changed when the integration runs, select No.
Click Tap Save.
(Optional) Specify the new and re-hired employees whose records to process:
Click Tap Create
. Person Numbers
Person Numbers parameter
Parameter Name
Enter Person Numbers.
Description
(Optional)
Template Parameter
Select Person Numbers.
Parameter Type
Select Text.
Default Value
(Optional)
Default = Include all employees.
To process data for only a limited group of employees:
- Clear Use Default.
- Enter the person numbers, as defined in the source system, each separated by a comma (
,) but no spaces.Example:
13997,15556,20012
User Prompted
To prompt the person who manually runs the integration to set this parameter, select Yes.
Click Tap Save.
(Optional) Specify the default rounding rule to apply to accruals balances:
Click Tap Create
. Rounding
Rounding parameter
Parameter Name
Enter Rounding.
Description
(Optional)
Template Parameter
Select Rounding.
Parameter Type
Select Text.
Default Value
(Optional) Enter one of the following:
- No Round (default)
- Round Down 0.5
- Round Down 1.0
- Round Up 0.5
- Round Up 1.0
User Prompted
To prompt the person who manually runs the integration to set this parameter, select Yes.
Click Tap Save.
(Optional) Specify the paycode to use for paycode edits:
Click Tap Create
. Adjustment Paycode
Adjustment Paycode parameter
Parameter Name
Enter Adjustment Paycode.
Description
(Optional)
Template Parameter
Select Adjustment Paycode.
Parameter Type
Select Text.
Default Value
(Optional) Enter the name of a paycode.
User Prompted
To prompt the person who manually runs the integration to set this parameter, select Yes.
Click Tap Save.
(Optional) Specify the default comment to use for paycode edits:
Click Tap Create
. Adjustment Comment
Adjustment Comment parameter
Parameter Name
Enter Adjustment Comment.
Description
(Optional)
Template Parameter
Select Adjustment Comment.
Parameter Type
Select Text.
Default Value
(Optional) Enter a comment.
User Prompted
To prompt the person who manually runs the integration to set this parameter, select Yes.
Click Tap Save.
(Optional) Specify whether to use the AccrualPolicy cross-reference table to get the accrual policy details for new and re-hired employees:
Click Tap Create
. ValidateAccrualCodeInCRT
Translate Source Codes Via CRT parameter
Parameter Name
Enter ValidateAccrualCodeInCRT.
Description
(Optional)
Template Parameter
Select ValidateAccrualCodeInCRT.
Parameter Type
Select Boolean.
Default Value
(Optional) Enter false.
User Prompted
If the value does not need to be changed when the integration runs, select No.
Click Tap Save.
- Click Tap Save.
-
Click Tap
Create
-
Install the Prorated Accruals FTE integration
-
Click Tap
Create
. - Enter an appropriate, unique, and descriptive Integration Name.
- (Optional) Enter a Description.
- Do not select API Integration.
- In File Access, select None to not select a connection.
- (Optional) If the person who runs the integration doesn't have full access to integrations, select Execute Integration with System Account. This allows the integration access to all APIs in the FAP, and the relevant permissions and data, regardless of the FAP and GDAP of the person who runs the integration.
-
(Optional) Select Re-Run to allow repeated runs of the integration with the same parameter values as the previous run.
- In Skip Configuration, select None(default) to allow multiple integrations to run at the same time or with the same data without restrictions.
- Do not select Allow Minute Interval.
-
Integration template and parameters
- In Integration Template, select ProratedAccrualsFTE_v4.5.
-
Click Tap
Assign
. - (Optional) In Integration Parameters, you can override default settings.
- Specify the following parameters:
Specify the default hyperfind query that contains FTE employees only:
Click Tap Create
. Hyperfind Name
Hyperfind Name parameter
Parameter Name
Enter Hyperfind Name.
Description
(Optional)
Template Parameter
Select Hyperfind Name.
Parameter Type
Select Text.
Default Value
(Optional) Enter Prorated Accruals Employees – Termination.
User Prompted
If the value does not need to be changed when the integration runs, select No.
Click Tap Save.
(Optional) Specify the FTE employees whose records to process:
Click Tap Create
. Person Numbers
Person Numbers parameter
Parameter Name
Enter Person Numbers.
Description
(Optional)
Template Parameter
Select Person Numbers.
Parameter Type
Select Text.
Default Value
(Optional)
Default = Include all employees.
To process data for only a limited group of employees:
- Clear Use Default.
- Enter the person numbers, as defined in the source system, each separated by a comma (
,) but no spaces.Example:
13997,15556,20012
User Prompted
To prompt the person who manually runs the integration to set this parameter, select Yes.
Click Tap Save.
(Optional) Specify the default rounding rule to apply to accruals balances:
Click Tap Create
. Rounding
Rounding parameter
Parameter Name
Enter Rounding.
Description
(Optional)
Template Parameter
Select Rounding.
Parameter Type
Select Text.
Default Value
(Optional) Enter one of the following:
- No Round (default)
- Round Down 0.5
- Round Down 1.0
- Round Up 0.5
- Round Up 1.0
User Prompted
To prompt the person who manually runs the integration to set this parameter, select Yes.
Click Tap Save.
(Optional) Specify the paycode to use for paycode edits:
Click Tap Create
. Adjustment Paycode
Adjustment Paycode parameter
Parameter Name
Enter Adjustment Paycode.
Description
(Optional)
Template Parameter
Select Adjustment Paycode.
Parameter Type
Select Text.
Default Value
(Optional) Enter the name of a paycode.
User Prompted
To prompt the person who manually runs the integration to set this parameter, select Yes.
Click Tap Save.
(Optional) Specify the default comment to use for paycode edits:
Click Tap Create
. Adjustment Comment
Adjustment Comment parameter
Parameter Name
Enter Adjustment Comment.
Description
(Optional)
Template Parameter
Select Adjustment Comment.
Parameter Type
Select Text.
Default Value
(Optional) Enter a comment.
User Prompted
To prompt the person who manually runs the integration to set this parameter, select Yes.
Click Tap Save.
(Optional) Specify the overdraft paycode to use for paycode edits:
Click Tap Create
. Overdraft Paycode
Overdraft Paycode parameter
Parameter Name
Enter Overdraft Paycode.
Description
(Optional)
Template Parameter
Select Overdraft Paycode.
Parameter Type
Select Text.
Default Value
(Optional) Enter the name of a paycode.
User Prompted
To prompt the person who manually runs the integration to set this parameter, select Yes.
Click Tap Save.
(Optional) Specify the default comment to use for overdraft paycode edits:
Click Tap Create
. Overdraft Comment
Overdraft Comment parameter
Parameter Name
Enter Overdraft Comment.
Description
(Optional)
Template Parameter
Select Overdraft Comment.
Parameter Type
Select Text.
Default Value
(Optional) Enter a comment.
User Prompted
To prompt the person who manually runs the integration to set this parameter, select Yes.
Click Tap Save.
(Optional) Specify whether to use the AccrualPolicy cross-reference table to get the accrual policy details for employees who change status to FTE:
Click Tap Create
. ValidateAccrualCodeInCRT
Translate Source Codes Via CRT parameter
Parameter Name
Enter ValidateAccrualCodeInCRT.
Description
(Optional)
Template Parameter
Select ValidateAccrualCodeInCRT.
Parameter Type
Select Boolean.
Default Value
(Optional) Enter false.
User Prompted
If the value does not need to be changed when the integration runs, select No.
Click Tap Save.
- Click Tap Save.
-
Click Tap
Create
-
Install the Prorated Accruals Termination integration
-
Click Tap
Create
. - Enter an appropriate, unique, and descriptive Integration Name.
- (Optional) Enter a Description.
- Do not select API Integration.
- In File Access, select None to not select a connection.
- (Optional) If the person who runs the integration doesn't have full access to integrations, select Execute Integration with System Account. This allows the integration access to all APIs in the FAP, and the relevant permissions and data, regardless of the FAP and GDAP of the person who runs the integration.
-
(Optional) Select Re-Run to allow repeated runs of the integration with the same parameter values as the previous run.
- In Skip Configuration, select None(default) to allow multiple integrations to run at the same time or with the same data without restrictions.
- Do not select Allow Minute Interval.
-
Integration template and parameters
- In Integration Template, select ProratedAccrualsTermination_v4.4.
-
Click Tap
Assign
. - (Optional) In Integration Parameters, you can override default settings.
- Specify the following parameters:
Specify the default hyperfind query that contains terminated employees only:
Click Tap Create
. Hyperfind Name
Hyperfind Name parameter
Parameter Name
Enter Hyperfind Name.
Description
(Optional)
Template Parameter
Select Hyperfind Name.
Parameter Type
Select Text.
Default Value
(Optional) Enter Prorated Accruals Employees – Termination.
User Prompted
If the value does not need to be changed when the integration runs, select No.
Click Tap Save.
(Optional) Specify the employees whose records to process:
Click Tap Create
. Person Numbers
Person Numbers parameter
Parameter Name
Enter Person Numbers.
Description
(Optional)
Template Parameter
Select Person Numbers.
Parameter Type
Select Text.
Default Value
(Optional)
Default = Include all employees.
To process data for only a limited group of employees:
- Clear Use Default.
- Enter the person numbers, as defined in the source system, each separated by a comma (
,) but no spaces.Example:
13997,15556,20012
User Prompted
To prompt the person who manually runs the integration to set this parameter, select Yes.
Click Tap Save.
(Optional) Specify the default rounding rule to apply to accruals balances:
Click Tap Create
. Rounding
Rounding parameter
Parameter Name
Enter Rounding.
Description
(Optional)
Template Parameter
Select Rounding.
Parameter Type
Select Text.
Default Value
(Optional) Enter one of the following:
- No Round (default)
- Round Down 0.5
- Round Down 1.0
- Round Up 0.5
- Round Up 1.0
User Prompted
To prompt the person who manually runs the integration to set this parameter, select Yes.
Click Tap Save.
(Optional) Specify the paycode to use for paycode edits:
Click Tap Create
. Adjustment Paycode
Adjustment Paycode parameter
Parameter Name
Enter Adjustment Paycode.
Description
(Optional)
Template Parameter
Select Adjustment Paycode.
Parameter Type
Select Text.
Default Value
(Optional) Enter the name of a paycode.
User Prompted
To prompt the person who manually runs the integration to set this parameter, select Yes.
Click Tap Save.
(Optional) Specify the default comment to use for paycode edits:
Click Tap Create
. Adjustment Comment
Adjustment Comment parameter
Parameter Name
Enter Adjustment Comment.
Description
(Optional)
Template Parameter
Select Adjustment Comment.
Parameter Type
Select Text.
Default Value
(Optional) Enter a comment.
User Prompted
To prompt the person who manually runs the integration to set this parameter, select Yes.
Click Tap Save.
(Optional) Specify the overdraft paycode to use for paycode edits:
Click Tap Create
. Overdraft Paycode
Overdraft Paycode parameter
Parameter Name
Enter Overdraft Paycode.
Description
(Optional)
Template Parameter
Select Overdraft Paycode.
Parameter Type
Select Text.
Default Value
(Optional) Enter the name of a paycode.
User Prompted
To prompt the person who manually runs the integration to set this parameter, select Yes.
Click Tap Save.
(Optional) Specify the default comment to use for overdraft paycode edits:
Click Tap Create
. Overdraft Comment
Overdraft Comment parameter
Parameter Name
Enter Overdraft Comment.
Description
(Optional)
Template Parameter
Select Overdraft Comment.
Parameter Type
Select Text.
Default Value
(Optional) Enter a comment.
User Prompted
To prompt the person who manually runs the integration to set this parameter, select Yes.
Click Tap Save.
(Optional) Specify whether to pay out accruals balances to terminated employees:
Click Tap Create
. Accruals Payout
Accruals Payout parameter
Parameter Name
Enter Accruals Payout.
Description
(Optional)
Template Parameter
Select Accruals Payout.
Parameter Type
Select Boolean.
Default Value
(Optional) Enter true.
User Prompted
To prompt the person who manually runs the integration to set this parameter, select Yes.
Click Tap Save.
(Optional) Specify whether to use the AccrualPolicy cross-reference table to get the accrual policy details for terminated employees:
Click Tap Create
. ValidateAccrualCodeInCRT
Translate Source Codes Via CRT parameter
Parameter Name
Enter ValidateAccrualCodeInCRT.
Description
(Optional)
Template Parameter
Select ValidateAccrualCodeInCRT.
Parameter Type
Select Boolean.
Default Value
(Optional) Enter false.
User Prompted
If the value does not need to be changed when the integration runs, select No.
Click Tap Save.
- Click Tap Save.
- Make sure that the generic data access profiles (GDAP) allow access by the people who need to run the installed integrations. Select ; see Configure Access to Integrations .
-
Click Tap
Create
Run and test the Prorated Accruals integrations
Run integrations to test that the configuration is set up correctly.
- Initial: For the initial run of the integration, process all historical pay statements.
- Scheduled: For subsequent runs, schedule this integration to export the payroll data only for employees who had changes or corrections made to their timecard.
- Run the Prorated Accruals Hire integration
- Select the integration:
- Select Main Menu
. - Click Tap Run an Integration
. - Select the ProratedAccrualsHire_v4.4 integration from the list. Click Tap Select.
- (Optional) Enter a unique Integration Run Name to make it easier to identify the run of the integration. Otherwise, the default name ends with a date and time stamp.
- Select Main Menu
- Set parameters as follows:
- Hyperfind Name: Default = Prorated Accruals Employees – Hire. (Not recommended) You can select a different hyperfind query.
- Person Numbers: (Optional) Enter the person numbers, as defined in the source system, each separated by a comma (
,) but no spaces. - Rounding: (Optional) Select a different rounding rule:
- No Round (default)
- Round Down 0.5
- Round Down 1.0
- Round Up 0.5
- Round Up 1.0
- Adjustment Paycode: (Optional) Select a different adjustment paycode to use for paycode edits.
- Adjustment Comment: (Optional) Select a different comment for paycode edits.
- ValidateAccrualCodeInCRT: (Optional) Specify whether to use the AccrualPolicy cross-reference table to get the accrual policy details for the employees.
- Select the following:
- Run Integration: If this is the first time this integration is being run.
- Re-Run: If this integration has been run before, and the status is not In-Progress, you can run the integration again without entering the parameter values again. Click Tap Yes to continue, or No to not run the integration and to return to the parameter settings.
- Wait for the confirmation that the integration completed or failed. Close the panel.
- Click Tap Refresh
. - To see details, select the integration run. Select Run Summary.
- Select the integration:
- Run the Prorated Accruals FTE integration
- Select the integration:
- Select Main Menu
. - Click Tap Run an Integration
. - Select the ProratedAccrualsFTE_v4.5 integration from the list. Click Tap Select.
- (Optional) Enter a unique Integration Run Name to make it easier to identify the run of the integration. Otherwise, the default name ends with a date and time stamp.
- Select Main Menu
- Set parameters as follows:
- Hyperfind Name: Default = Prorated Accruals Employees – FTE. (Not recommended) You can select a different hyperfind query.
- Person Numbers: (Optional) Enter the person numbers, as defined in the source system, each separated by a comma (
,) but no spaces. - Rounding: (Optional) Select a different rounding rule:
- No Round (default)
- Round Down 0.5
- Round Down 1.0
- Round Up 0.5
- Round Up 1.0
- Adjustment Paycode: (Optional) Select a different adjustment paycode to use for paycode edits.
- Adjustment Comment: (Optional) Select a different comment for paycode edits.
- Overdraft Paycode: (Optional) Select a different overdraft paycode to use for paycode edits.
- Overdraft Comment: (Optional) Select a different comment for overdraft paycode edits.
- ValidateAccrualCodeInCRT: (Optional) Specify whether to use the AccrualPolicy cross-reference table to get the accrual policy details for the employees.
- Select the following:
- Run Integration: If this is the first time this integration is being run.
- Re-Run: If this integration has been run before, and the status is not In-Progress, you can run the integration again without entering the parameter values again. Click Tap Yes to continue, or No to not run the integration and to return to the parameter settings.
- Wait for the confirmation that the integration completed or failed. Close the panel.
- Click Tap Refresh
. - To see details, select the integration run. Select Run Summary.
- Select the integration:
- Run the Prorated Accruals Termination integration
- Select the integration:
- Select Main Menu
. - Click Tap Run an Integration
. - Select the ProratedAccrualsTermination_v4.4 integration from the list. Click Tap Select.
- (Optional) Enter a unique Integration Run Name to make it easier to identify the run of the integration. Otherwise, the default name ends with a date and time stamp.
- Select Main Menu
- Set parameters as follows:
- Hyperfind Name: Default = Prorated Accruals Employees – Termination. (Not recommended) You can select a different hyperfind query.
- Person Numbers: (Optional) Enter the person numbers, as defined in the source system, each separated by a comma (
,) but no spaces. - Rounding: (Optional) Select a different rounding rule:
- No Round (default)
- Round Down 0.5
- Round Down 1.0
- Round Up 0.5
- Round Up 1.0
- Adjustment Paycode: (Optional) Select a different adjustment paycode to use for paycode edits.
- Adjustment Comment: (Optional) Select a different comment for paycode edits.
- Overdraft Paycode: (Optional) Select a different overdraft paycode to use for paycode edits.
- Overdraft Comment: (Optional) Select a different comment for overdraft paycode edits.
- Accruals Payout: (Optional) Specify whether to pay out accruals balances to terminated employees.
- ValidateAccrualCodeInCRT: (Optional) Specify whether to use the AccrualPolicy cross-reference table to get the accrual policy details for the employees.
- Select the following:
- Run Integration: If this is the first time this integration is being run.
- Re-Run: If this integration has been run before, and the status is not In-Progress, you can run the integration again without entering the parameter values again. Click Tap Yes to continue, or No to not run the integration and to return to the parameter settings.
- Wait for the confirmation that the integration completed or failed. Close the panel.
- Click Tap Refresh
. - To see details, select the integration run. Select Run Summary.
- Select the integration:
- Check the results
Status indicators
-
In-Progress: The run of this integration has not yet completed. -
Completed: The integration ran successfully without errors. -
Scheduled: This integration is scheduled to run later or repeatedly. - (Grayed out) Scheduled but Deleted: This integration is scheduled to run, but the integration template has been deleted. When it runs, it will generate an error. To prevent this error, delete the scheduled integration run.
-
Completed with Errors: The integration ran successfully, but one or more records have errors. The integration run is treated as failed. If Abort on Failure is configured in an integration set, the integration set stops. -
Failed: The integration run has errors or could not run. - To troubleshoot and resolve errors, do the following:
Check the Run Summary for details.
- To troubleshoot all types of errors, or if the Run Summary shows a large number of errors, click tap Go to Additional Details (if available), or click tap the Source File to open and examine the input source file.
- (Only for import integrations) To troubleshoot and resubmit integrations that have transactional or data errors, click tap Go to Transaction Assistant.
To check the results in more detail, do the following:
- To see detailed results, click tap the tile for the integration run.
- Click Tap Run Summary to see the results of the integration run.
Example Run Summary details
Note: The available details vary by integration and configuration.- Integration Run Name: Name of this run of the integration.
- Process Name: Name of any integration set that includes this integration.
- Integration Name: Name of the installed integration.
- Integration Reference ID: Unique identifier for this integration run (to help in troubleshooting errors).
- User: The person or user account that ran the integration.
- Integration Type: Import, Export, or None
- Start Date: Date and time when the integration run started.
- End Date: Date and time when the integration run finished.
- Status: In-Progress, Completed, Completed with Errors, or Failed.
- Records Processed: Number of records that were processed.
- Records Created: Number of records that were created.
- Errors: Number of records that failed.
- Source Files, Output File, and Error Files: For file-based import integrations, use Manage SFTP to access the source and output files on the inbound (source) and outbound (destination) SFTP folders. See the Manage SFTP topic.
- Log in to the destination system and make sure that the data has been correctly updated.
Note: You can schedule integrations and integration sets to run once later or at a recurring frequency. See the Schedule Integrations topic. -
APIs
|
API name |
Resource path |
Type |
Description |
|---|---|---|---|
|
/v1/timekeeping/setup/accrual_profiles |
GET |
Retrieve accrual profiles. | |
|
/v1/platform/integrations/update_status |
POST |
Update the integration status. | |
|
/v1/commons/data/multi_read |
POST |
Retrieve data from the application. | |
|
/v1/timekeeping/accruals/updates |
POST |
Apply updates to accrual balances for multiple employees. | |
|
/v1/commons/persons/extensions/multi_read |
POST |
Retrieve the employee signed-off date and locale. | |
|
/v1/commons/hyperfind/execute |
POST |
Retrieve employees that match the hyperfind conditions. | |
|
/v1/timekeeping/timecard |
POST |
Update timecard. | |
|
/v1/timekeeping/pay_code_edits/multi_delete |
POST |
Bulk delete paycode edits for multiple employees. | |
|
/v1/timekeeping/timecard_metrics/multi_read |
POST |
Retrieve timecard data. | |
|
/v1/timekeeping/accruals/payouts |
POST |
Perform bulk accrual payouts. | |
|
/v2/timekeeping/setup/employment_terms/{id} |
GET |
Retrieve employment terms. | |
|
/v1/commons/data_dictionary/data_elements/multi_read |
POST |
Retrieve data element definitions by keys. |
Version history
|
Version |
Description |
|---|---|
|
1 |
Initial release. |
|
2 |
Enhanced to enable processing of large data volumes in a single integration run. Addressed date checks. |
|
3 |
Enhanced to consider Accrual Profiles defined in Employment Terms. Addressed an issue with future-dated FTE changes that cause the integration to fail. |
|
4 |
Enhanced to consider Length of Service. Run Summary code optimization. |
|
4.1 |
Addressed issues related to:
Introduced integration run time parameter, ValidateAccrualCodeInCRT, that by default shows or hides a message when an accrual code is defined in the Accrual Policy, but not in the CRT. |
|
4.2 |
Addressed the following issues:
|
|
4.3 |
Addressed an issue to clear signed-off data from the FTE extension table in a single integration run. |
|
4.4 |
Addressed a no data produced issue by setting the onlyReturnChangedEntities parameter value as true. |
|
4.5 |
ProratedAccrualsHire_v4.4: No change ProratedAccrualsFTE_v4.5: Adjusted the API request to add overdraft paycode edit. ProratedAccrualsTermination_v4.4: No change |