Configure the Universal Accruals Export Integration
How to configure connection settings, process properties, cross-reference tables, and data maps for this integration.
This topic describes how to configure this integration.
This integration exports all accrual records for employees to a flat file.
Universal integration packs exchange data by way of flat files, either to export data to the file or import data from the file. Other systems access the data in these flat files to complete the import or export integration. The default settings allow rapid configuration and runs of the integration process, while the exposure of the data maps and cross-reference tables in the extensions allows overrides and customizations of the default data mappings or values.
Before you start
Before you start to configure the Universal Accruals Export integration.
Deploy the AccrualExport integration pack; see Deploy Integration Packs to your Atom.
Configure the integration
How to configure this integration.
Select the environment
-
Open the Integration Template Designer: Select Main Menu .
Note: If prompted, enter your Username and Password. Click Tap Log in. - Select the Manage tab > Atom Management.
- Select your environment.
Select environment extensions
- In Administration, click tap Environment Extensions.
- In
Process Filter,
click tap
the magnifying glass

. It can take several seconds before the button becomes active. - Scroll to and select the integration pack: .
Configure connection settings
- Select Connection Settings.
-
From the Connection dropdown list, select and configure:
Connection Settings
Connection Settings for the Universal Accruals Export integration
Setting
Required
Actions
APIGatewayServer
Required
To change the default API gateway server:
- Clear Use Default.
- Enter the URL to the server.
Example:
<tenantURL>/api
SFTPServer
Required
The SFTP server setting defines the connection to the file that contains the records. Integrations access only the internal SFTP account.
To change the default SFTP server parameters:
- For each field, clear Use Default.
- Enter the following values:
-
Enter the name of the internal Host.
-
Enter the number of the Port for the internal SFTP account.
-
In User, enter the username for the internal SFTP account.
-
In Password, select <Encrypted>. Enter the new password for the internal SFTP account.
-
Click Tap Apply.
-
Configure process properties
Process properties apply globally to all records that an integration processes. When you install the integration, you can define the parameter values or configure a prompt for the user to define the value when they run the integration.
- Select .
-
AuthenticationProperties define properties to connect to the authentication server and get the access token to execute APIs. Leave all of these values at their default settings.
-
From the Process Property dropdown list, select AccrualExport_ProcessProperties to set process properties that must be configured before the integration can run.
Caution: If you select Use Default for the connection settings and process properties, ensure that Value is blank. If Value is not blank, that value overrides the default value whether or not Use Default is selected or cleared. Example: If the default value is abc, but Value shows xyz, the integration uses xyz regardless of the setting of Use Default.Process Properties
Process Properties for the Universal Accruals Export integration
Property
Required
Actions
DisqualifyActive
Not required
To not process person records of active employees:
- Clear Use Default.
- Select Value.
DisqualifyInActive
Not required
To not process person records of inactive employees:
- Clear Use Default.
- Select Value.
OutputFileName
Required
Name of the file to store the generated export data
- Clear Use Default.
- Enter the file name. Use a
.csvextension.
Default =
AccrualOut.csv.ProcessTheseAccrualCodesOnly
Not required
Enter the short names for the accrual codes to export.
- Separate each name with a comma.
- Leave blank to export all accrual codes.
DoNotShowRecordsWithZeroAccrualBalance
Not required
Default = true, exclude accruals that have a balance of zero.
To include accruals that have a balance of zero:
- Clear Use Default.
- Select Value.
PayPeriod
Not required
To change the pay period:
- Clear Use Default.
- Enter one of the following values for the pay period:
0 = Previous pay period
1 = Current pay period
2 = Next pay period
3 = Previous schedule period
4 = Current schedule period
5 = Next schedule period
6 = Week to date
7 = Last week
8 = Yesterday
10 = Range of relative dates
11 = Specific date
12 = Relative specific date
13 = Today
IncludeEmployees
Not required
Default = Include all employees.
To process data for only a limited group of employees:
- Clear Use Default.
- Enter the person numbers, as defined in the source system, each separated by a comma (
,) but no spaces.Example:
13997,15556,20012
HyperfindAndLocations
Not required
Default = blank
Default = 1 (shown as blank) which indicates All Home and includes all active employees.
To select another hyperfind and locations:
- Clear Use Default.
- (Required) Enter the ID of a single hyperfind, or the IDs of one or more locations each separated by a comma (
,) or number sign (#).Caution: If you do not enter an ID for the Template Parameter, the integration cannot identify the hyperfind and the integration run fails.
Note:Ad-hoc hyperfinds are not supported.
All Home does not include terminated and inactive employees even if they have totals during the period. To include these totals, configure a hyperfind that includes terminated and inactive employees for the organization and select that hyperfind in this process property.
The maximum number of employees in a hyperfind is 3500. To process more employee records, divide the population into smaller hyperfinds to run sequentially.
AccrualCodeMappingIsRequired
Not required
To map accrual codes to other values for export:
- Clear Use Default.
- Select Value.
-
From the Process Property dropdown list, select AccrualExport_ConfigurationProperties to define configuration settings of the integration templates.
Select:
Configuration Properties
Configuration Properties for the Universal Accruals Export integration
Setting
Required
Actions
OutputDirectory
Not required
The directory on the SFTP server to archive the output files.
Default =/Outbound.Caution:Do not change the name of the folder from
Outbound. Additional or differently named folders are not supported by .To define a different directory path:
- Clear Use Default.
- Enter the directory path.
_FileNameContainsCurrentDate
Not required
Default = true, the filename includes the current date.
To remove the date of the export from the filename:
- Clear Use Default.
- Select Value.
_WriteCreatedOnDateInReportFooter
Not required
To put the date and time of the export in a footer in the output file:
- Clear Use Default.
- Select Value.
_IsCustomizedOutput
Not required
Default = false
- From the Process Property dropdown list, select AccrualExport-vx_CRTConfig to define headers in cross-reference tables.
Cross-reference tables (CRT) are the look-up tables that the integrations use to translate parameter values. One or more data values from the source system can be used to assign one or more parameters in the destination system.
Caution: The Boomi™ application does not return default values for cross-reference table headers. You have to enter the headings in Value.Note: For details, see Configure cross-reference tables.In _AccrualExport-vx_AccrualCodeMappingCRT:
- Clear Use Default.
- In Value, enter the headers, separated by commas (
,) but no spaces, exactly as shown below the Value field. You can select and copy the headers from the screen, then paste them in the Value field.
Configure cross-reference tables
Cross-reference tables (CRT) are the look-up tables that the integrations use to translate parameter values. One or more data values from the source system can be used to assign one or more parameters in the destination system.
A cross-reference table (CRT) translates parameter values in an integration as follows:
- Organizes data values into rows and columns:
- Maximums = 20 columns, 10,000 rows.
- Can combine values from multiple columns to determine a single output value.
- If more than one row matches a reference value, the first match is the output value.
- If no match is found, the output value can be null, or the integration can produce errors.
-
Caution: For the cross-reference tables that you are customizing, make sure that Use Default is not selected in , and that the headers are defined.
- Select Cross Reference.
-
From the
Cross Reference dropdown list, select
AccrualCodeMappingCrossReferenceTable.
Column headers:
ACName,NewACName,NewShortName -
Select Override to:
- Download the tables when you run the integration
- Edit the table cells in Extensions
- To import mappings from a source file, set _IsCustomizedOutput to true.
Configure data maps
(Optional)
A data map translates a data structure from the source format to the destination format. Examples: Map "PersonID" in the source to "Person ID" in the destination or "LastName" to "Last Name".
Each integration pack has a default data map. Editing of the default map is limited to adding fields, changing mappings, or inserting functions. Any changes override the previous values. If the predefined fields do not suite your requirements, use the default map as a guide when you create your custom data map.
To customize data transformation:
- Select Data Maps.
-
From the
Data Maps dropdown list, select
AccrualExportFlatFileProfile — CustomizedOutputFields to define a custom map with your own fields and ordering to map the data from the source to the destination.
Example data map
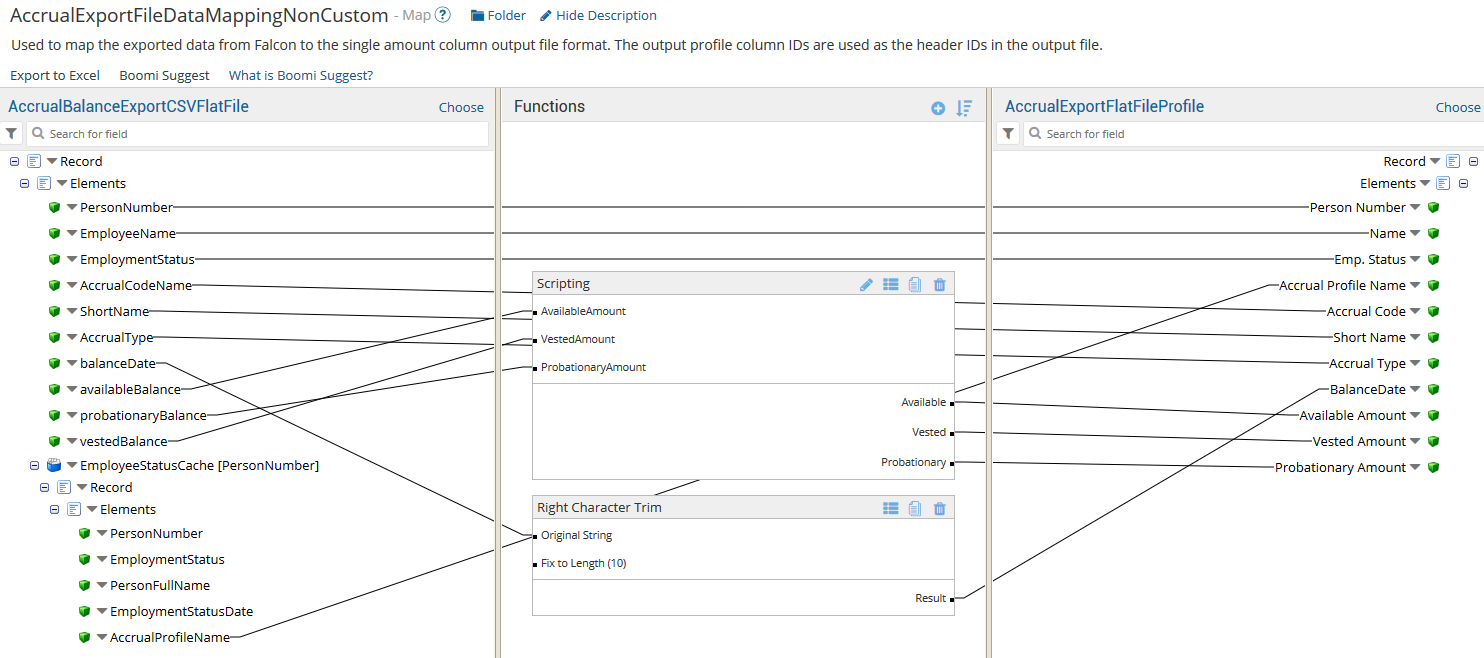
-
Select

to expand or
to collapse levels.To expand all levels, right-click the green boxes icon
. Select Expand All
.The lines show the links between fields in the source (left side), any intermediate functions, and the destination (right side).
-
(Optional)
Caution: The default mappings are developed and tested based on best practices. If you make changes, you may get unexpected results. Modify and test carefully.-
Change mappings — When you customize a default data map, you can add fields only to the end of the map.
You can select and drag to change the links between the source (left column), function (middle column), and destination (right column) items. A single source field can link to multiple destination fields, but a destination field can link to only one source field.
-
Transform the data — A map can include intermediate functions that transform the data. Examples: Perform mathematical calculations on the values or get values from a cross-reference table.Note: To override a field — for example because you cannot delete it from a default map — insert a function that has a null output.
- In Function,
click tap
the plus button

to add an intermediate function. - From Category, select a category of functions:
String — Trim, add to, concatenate, replace, remove, split, or change the case of text.
Caution: Do not use special characters such as angle brackets (<or>) in data in cross-reference tables, data maps, and input files. These characters can make the integration fail.Numeric — Perform mathematical calculations on the data.
Date — Change the format or get the current date.
Lookup — Get data from a cross-reference table (CRT), document cache, SQL query, or define a key-value change.
Connector — Call a value from a connector to an application or data source.
Custom Scripting — Transform data by way of Groovy or JavaScript code.
Properties — Get or set process or document properties.
- Select the function from the list in the selected category.
- Click Tap OK.
- If prompted in Configure Defaults, enter the relevant values. Select a Caching. Click Tap OK.
- Select and drag from a source field to an input of the function.
- Select and drag from the output of the function to a destination field.
- Repeat to add another function.
- In Function,
click tap
the plus button
-
Change mappings — When you customize a default data map, you can add fields only to the end of the map.
- When you finish, click tap OK.
Default files for Accruals Export
Base integration: AccrualExport-v1
Default source file =
AccrualOut.csv.
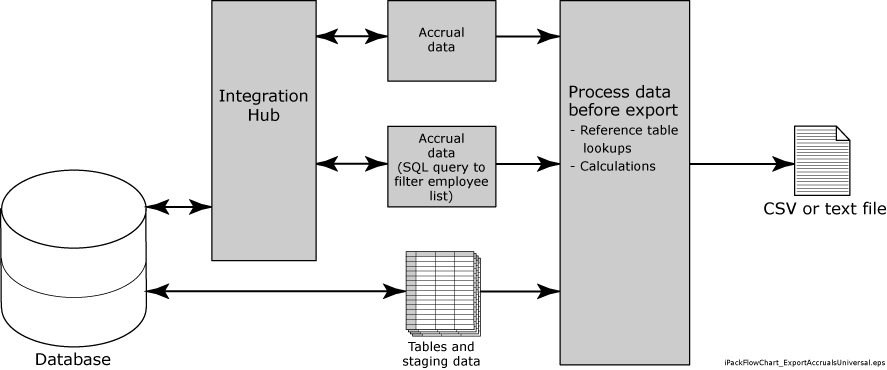
Design of the Universal Accruals Export integration
This section provides detailed information to help you to assess whether this integration meets your business needs.
Filter accruals for export
- Select employees by Hyperfind.
-
Include or exclude the following:
Active employees
Inactive or terminated employees
All employee accrual-type values
Historical edits
Signed-off employees
Data by current pay period
Accrual codes
Process
- Use a reference table to select accrual codes and calculate amounts in time or currency.
- Multiply, add, or round the amounts as needed.
- Use a reference table to map accrual codes between the systems.
Output
- Export the data to flat files.
- Complete the accrual data.
- Summarize the number of hours for leaves taken, accrued, and carried forward, and summarize balances.
Options
- Aggregate records daily.
- Include or exclude pay codes.
- Append an existing export file.
- Import mapping codes from a reference table.
- Output data to a flat file.